WordPressを新規インストールしたときに「カスタマイズ」からトップページや投稿記事、メニューなどが用意できる機能があるのは知っていますか?(※ WordPress4.7以上)
リリース当初はクラシックエディターでしたが、ブロックエディターが搭載された現在でももちろん作成できます。
今回は、Twenty Twentyのテーマから抜粋して記述をご紹介します。
https://github.com/WordPress/twentytwenty
スターターコンテンツのサポートをする
スターターコンテンツはadd_theme_supportで機能を追加します。
Twenty Twentyではfunctions.phpの122行目〜130行目にあります。
https://github.com/WordPress/twentytwenty/blob/master/functions.php#L122-L130
/*
 * Adds starter content to highlight the theme on fresh sites.
 * This is done conditionally to avoid loading the starter content on every
 * page load, as it is a one-off operation only needed once in the customizer.
 */
if ( is_customize_preview() ) {
	require get_template_directory() . '/inc/starter-content.php';
	add_theme_support( 'starter-content', twentytwenty_get_starter_content() );
}
incフォルダ内にあるstarter-content.php が呼び出されていますね。
これはtwentytwenty_get_starter_content()の関数が記述されていました。
make.wordpress.org の記事ではadd_theme_supportの引数で内容が記述されていましたが、用意するコンテンツによってはかなり膨大な量になるので、Twenty Twentyのように分割してしまったほうが読みやすそうですね。
複数のブログ記事を追加したい
コアで定義されているのはhome、about、 contact、 blog、 news、homepage-section です。
スターターコンテンツで複数のブログ記事やカスタム投稿に記事を入れたいときは、これらを避けて定義すれば、複数登録できます。
たとえば以下のような感じです。
<?php
/**
 * HAMWORKS Starter Content
 *
 * @link https://make.wordpress.org/core/2016/11/30/starter-content-for-themes-in-4-7/
 *
 * @package hamworks
 */

/**
 * Function to return the array of starter content for the theme.
 *
 * @return array a filtered array of args for the starter_content.
 */
function hamworks_get_starter_content() {
	$starter_content = array(
		'posts'       => array(
			'front',
			'blog',
			'post1' => array(
				'post_type'    => 'post',
				'post_title'   => '投稿1です',
				'thumbnail'    => '{{image-opening}}',
				'post_content' => join(
					'',
					array(
						'<!-- wp:paragraph -->',
						'<p>投稿サンプルです。</p>',
						'<!-- /wp:paragraph -->',
					)
				),
			),
			'post2' => array(
				'post_type'    => 'post',
				'post_title'   => '重要なお知らせ',
				'thumbnail'    => '{{image-opening}}',
				'post_content' => join(
					'',
					array(
						'<!-- wp:paragraph -->',
						'<p>投稿サンプルです。</p>',
						'<!-- /wp:paragraph -->',
					)
				),
			),
			'post3' => array(
				'post_type'    => 'post',
				'post_title'   => '制作実績を更新しました',
				'thumbnail'    => '{{image-opening}}',
				'post_content' => join(
					'',
					array(
						'<!-- wp:paragraph -->',
						'<p>投稿サンプルです。</p>',
						'<!-- /wp:paragraph -->',
					)
				),
			),
		),
		'options'     => array(
			'show_on_front'  => 'page',
			'page_on_front'  => '{{front}}',
			'page_for_posts' => '{{blog}}',
		),

	);

	/**
	 * Filters Futuristic array of starter content.
	 *
	 * @param array $starter_content Array of starter content.
	 */
	return apply_filters( 'hamworks_starter_content', $starter_content );

}
post1〜3で分けると、3件の投稿が増えていることを確認しています。これが例えばすべてpostAとかだと上書きしてしまい、最後の1件しか追加されませんでした。
正直、参考にできる情報が少なすぎてこれで本当に合ってるのかはわかりません…。
スターターコンテンツが作れないとき
スターターコンテンツは新規でWordPressインストールしたときにしか作成できません。(ちょっと不便)
デバッグ等で繰り返し作成したいときは、functions.php に以下の記述を入れます。
update_option( 'fresh_site', 1 );あくまでデバッグ用なので、開発が終わったら削除しましょう。
これで、新規インストール時でなくてもカスタマイザーからスターターコンテンツが作成できます。
記事の内容の作り方
複数のブログ記事を作る、のサンプルで書いたように、post_contentの中にブロックを書いていくのですが、いちいち書くのは現実味がありません。
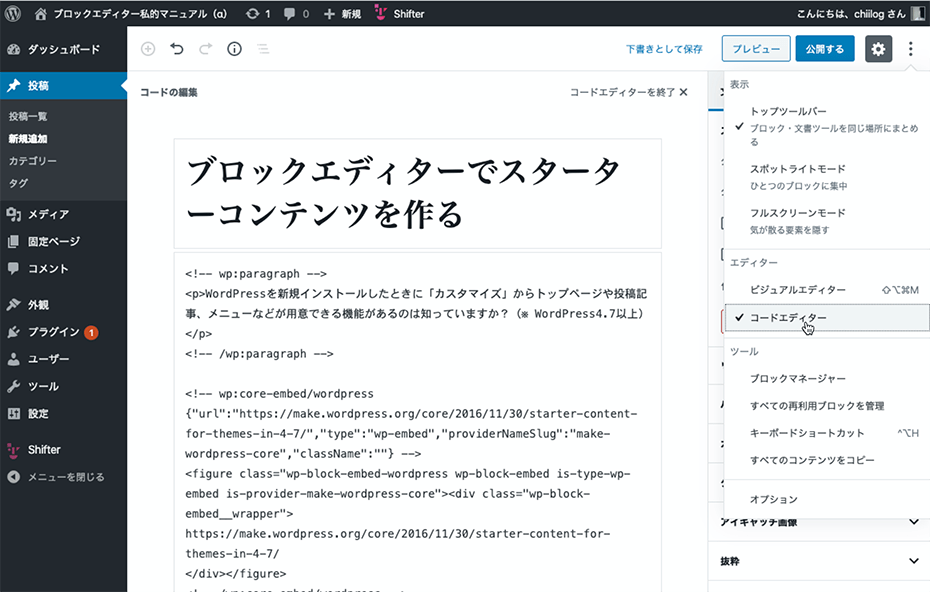
私のオススメは、一旦WordPressの投稿画面で作りたい内容を作ってしまい、「コードエディター」のモードにしてコピーすることです。

画像ブロックやカバーブロックなどの画像を用いるブロックの画像は、テーマの中に含めておきます。
そして、該当ブロックの画像のURLをテーマに保存した画像のURLを参照するように書き換えておくと良いと思います。
例えば以下のような感じです。(post_contentのみ抜粋)
'post_content' => join(
	'<!-- wp:cover {"url":"' . get_theme_file_uri( '/assets/images/starter/image01.jpg' ) . '","id":2364,"overlayColor":"black","focalPoint":{"x":0.5483870967741935,"y":0.4861111111111111},"align":"full"} -->',
	'<div class="wp-block-cover alignfull has-black-background-color has-background-dim" style="background-image:url(' . get_theme_file_uri( '/assets/images/starter/image01.jpg' ) . ');background-position:54.83870967741935% 48.61111111111111%"><div class="wp-block-cover__inner-container"><!-- wp:heading {"align":"center","level":1,"textColor":"white"} -->',
	'<h1 class="has-white-color has-text-color has-text-align-center">メインビジュアル</h1>',
	'<!-- /wp:heading -->',
	'<!-- /wp:cover -->',
)
なかなか準備が大変ですが、「サムネイルと全く同じサイトが作れる」というのは、サイト制作に馴染みのない人にとってはすごくありがたい機能なので、ぜひ挑戦してみてください!
